

Beginners Guide to Growing Weed Indoors
Growing cannabis indoors can be a rewarding and fulfilling experience. With the right guidance, it’s an easy learning process, and you can achieve better results than what’s available at your local dispensary. While cannabis can flourish when grown outdoors, growing cannabis indoors offers optimal conditions that are easier to control for beginner growers. Additionally, marijuana plants can be grown discreetly and without any unwanted aromas.
Necessary materials and equipment
Before starting to grow weed indoors, there are a few things you should consider. One of the most important things is the area of your growing space. Plants will require frequent attention and should be easily accessible for watering. It’s recommended to position your grow tent near electrical outlets to support necessary equipment. Avoid placing the tent in direct sunlight or warm areas to prevent an increase in temperature inside the tent.
To simplify things, we’ve compiled a comprehensive list of all the equipment for growing weed indoors. Let’s get started!
High-quality Seeds

To grow the best cannabis, you need to start with the best genetics. With years of experience working alongside the cannabis community, Humboldt Seed Company has developed a diverse range of genetics to make growing more straightforward and accessible for everyone. Selecting the right weed strain to grow can be tricky for beginners, but fear not! We’ve identified five key points to consider, and we’re excited to help you achieve your cannabis-growing goals.
1. Yield
In general, Indica-dominant strains tend to produce higher yields per square meter than sativa-dominant ones. It’s essential to remember that environmental conditions and experience also play a vital role, so don’t be discouraged if your initial yields are lower. Remember, practice makes perfect.
2. Height and space
When growing marijuana plants indoors, the amount of available space is an essential factor to consider. If you have limited space, it’s advisable to choose indica-dominant and autoflowering variants, which often won’t grow taller than 1 meter.
3. Flavor and aroma
If you are trying to find a strain with a particular aroma or taste, it’s important to understand that terpenes are the aromatic compounds responsible for contributing to the unique scent and flavor of cannabis plants. All reputable seedbanks provide terpene profiles for their strains, so consider that when making your selection.
4. Effect
Sativa strains are renowned for their uplifting, cerebral high, while Indica-dominant strains provide a relaxing body stone. It’s important to note that most strains are hybrids with varying sativa and indica genetics ratios.
5. Flowering time
Indoors, the lighting schedule and amount of light can be easily manipulated to trigger the flowering process. For beginners, selecting strains with shorter flowering times is recommended. However, strains with longer flowering times can be experimented with.
Growing medium or soil
For those setting up an indoor grow for the first time, bagged soil is an excellent choice. It’s readily available, cost-effective, and delivers a steady supply of nutrients while retaining water and vital minerals. If you’re growing weed indoors, stick to soil with a pH range of 6.0 to 7.0 for the best results. If you’re a beginner grower, here are three of the best soils to get you started. With these options, you’ll be able to cultivate thriving and healthy plants that you’ll be thrilled with.
- BioBizz All Mix is an organic, peat-based potting soil blend pre-fertilized with many nutrients and beneficial bacteria. It imitates a rich, true-living soil composition and is perfect for almost all indoor grow rooms.
- Canna Terra Professional is a nitrogen-rich potting soil with an advanced water and air system, making it ideal for almost all cultivation methods. It contains top-quality black peat, fine peat moss, and perlite, making it perfect for growing marijuana indoors.
- Ocean Forest Potting Mix is a premium blend of aged forest products, sphagnum peat moss, earthworm castings, bat guano, fish emulsion, and crab meal. It’s light, aerated texture is perfect for indoor gardens and can be used straight out of the bag.
Pots
The size of the pot will affect the size of the plant, so select a size suitable for your indoor growing area. For beginner growers, it’s best to use 3 to 7-gallon pots with adequate drainage holes, providing enough space for the roots to flourish while keeping the plants manageable.

- Plastic pots are highly durable and protect the roots from extreme temperatures when grown indoors. Additionally, they are effortless to move around and clean. Moreover, they are readily available at garden centers, making them a go-to for many beginners growing cannabis.
- Smart pots provide enhanced aeration, which promotes better oxygenation, allowing increased root development. The fabric material facilitates easy drainage, preventing overwatering issues. They’re also lightweight and portable, convenient for moving plants between locations.
Nutrients
To ensure optimal growth during the cannabis growth cycle, it’s vital to understand the roles of nitrogen, phosphorus, and potassium. These are represented by NPK ratios, which specify the percentage of nitrogen (N), phosphorus (P), and potassium (K).
Following the recommended feeding schedules from the manufacturer and monitoring pH levels can help avoid nutrient issues. Consider obtaining a pH testing kit and necessary adjusters for best results. Here are three of our favorite options to get you started.
- Biobizz Starter’s Pack includes all the nutrients and boosters needed. Bio-Grow is used during vegetation, while Bio-Bloom nutrient provides extra nutrients during the flowering stage. Root Juice booster builds a substantial root mass, Bio-Heaven is a biological booster for healthier plants, and Top-Max Booster enhances crop quality and size. Perfect for beginners!
- Fox Farms Soil Liquid Pack is a three-part nutrient system designed to provide your plants with everything they need for optimal development. The three components – Big Bloom, Grow Big, and Tiger Bloom – work together synergistically to create an ideal growing environment for indoor plants.
- Advanced Nutrients Starter Kit includes everything you need to begin cultivating your crops. Sensi Grow and Bloom will supply nutrients during the vegetative and bloom phases. Additionally, the kit has five additives that will help promote healthy growth and result in bigger, tastier buds.
Grow tent
For indoor cannabis cultivation, growers strive to replicate the optimal outdoor conditions inside their growing spaces, and grow tents, which come in various sizes, are a great option. These tents have an internal reflective surface that maximizes light coverage and bars across the top that can be used for hanging lights and exhausting fans. With numerous grow tents available, we highly recommend investing in one of these tents for optimal results.
- The Vivosun 3 x 3 grow tent is made of 600D Oxford canvas, reflective mylar walls, and upgraded lightproof zippers. It’s sturdy and easy to assemble, with multiple openings for equipment. The tent can support up to 100 lbs and has transparent windows for observation and heat dissipation. It fits 2 to 4 plants in 3-gallon containers and has a removable floor tray for maintenance.
- If you’re an intermediate grower looking for extra space to cultivate 4 to 6 plants in 3-gallon containers, the pro-grade 4 x 4 grow tent by Spider Farmer is an excellent option. It’s energy-efficient and boasts a metal frame that’s more robust and thicker than most grow tents. With easy observation and smooth ventilation, this tent is designed to make your growing experience a breeze. Plus, it’s easy to install without any tools required.
- For the experienced grower, the Gorilla 5 x 5 grow tent is a top pick. It has double-thick canvas walls and sturdy steel poles that can hold up to 300 lbs. Additionally, it has pro features like light-tight zippers and two doors for full garden access, making it easy to monitor your plants. With the ability to comfortably fit 6 to 9 plants in 3-gallon containers, this grow tent is an excellent choice for those looking to take their gardening to the next level.
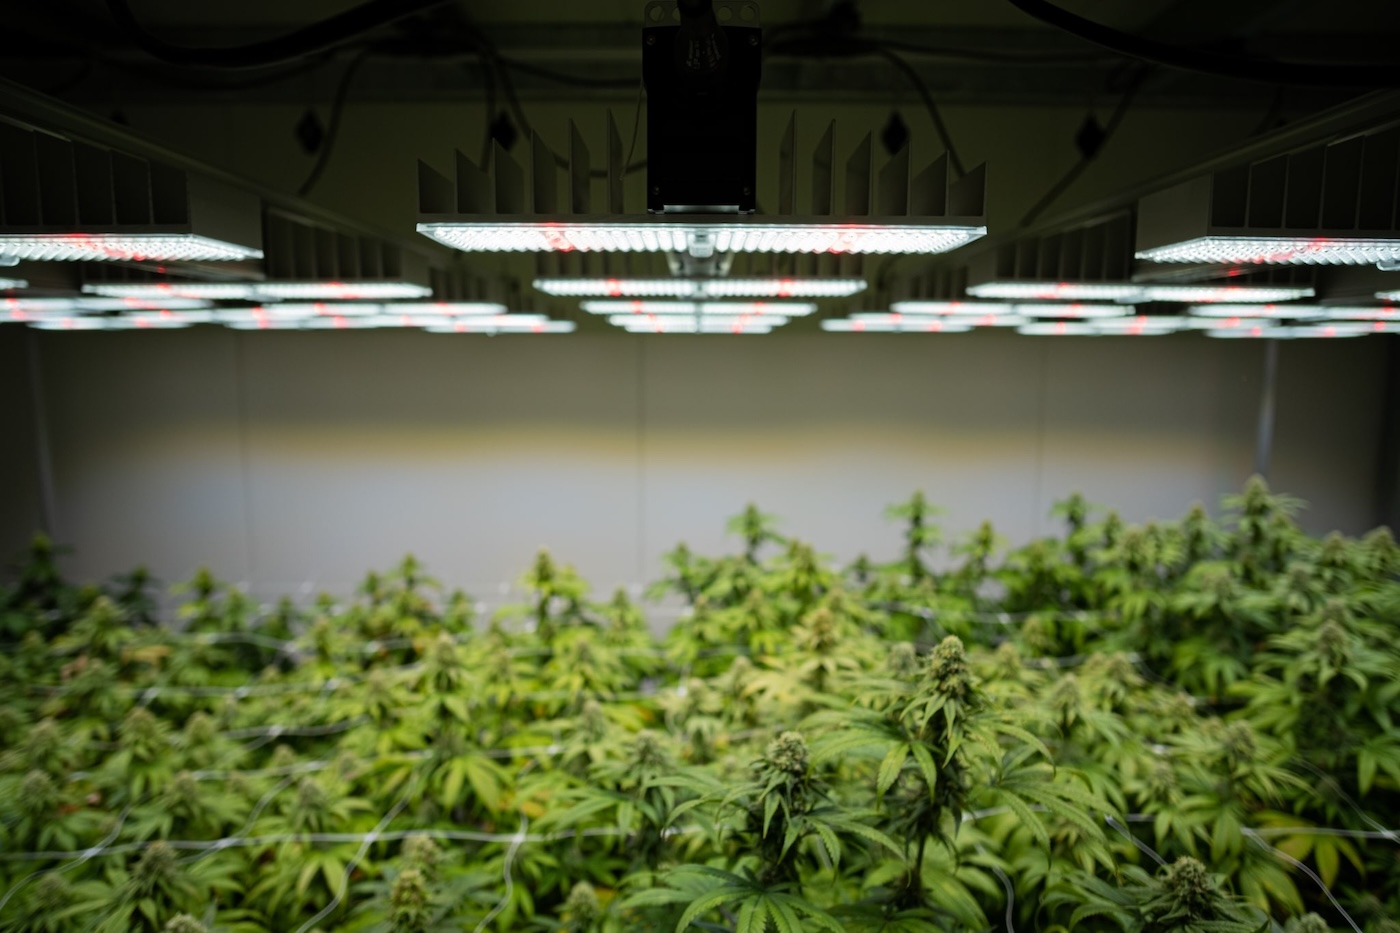
Lights

For growing weed at home, you have two types of light to choose from: high-intensity discharge (HID) or LED grow lights. HID lamps can be costly and generate excessive heat, which is unsuitable for growing in confined spaces. LED lights are reasonably priced and create less heat, making them more suitable for indoor growing. Here are three of the best options available.
- Mars Hydro TS1000 provides ample light for 2-4 plants and comes with a reasonable price tag. Additionally, its dimmable brightness control feature and marked yield improvement make it a tremendous energy-saving option for novice growers.
- Spider Farmer SF 2000 is a compact, affordable light fixture with excellent light penetration, perfect for intermediate growers looking to grow 4-6 plants. It features Quantum board LED with Samsung diodes and a remarkable dimming function.
- The full-spectrum Mars TSW 2000 is ideal for experienced growers looking to cultivate up to 8 plants. The latest SMD LED technology guarantees maximum yield and crop quality. It’s daisy chain function lets you connect up to 15 multi-lights, making it perfect for large indoor areas.
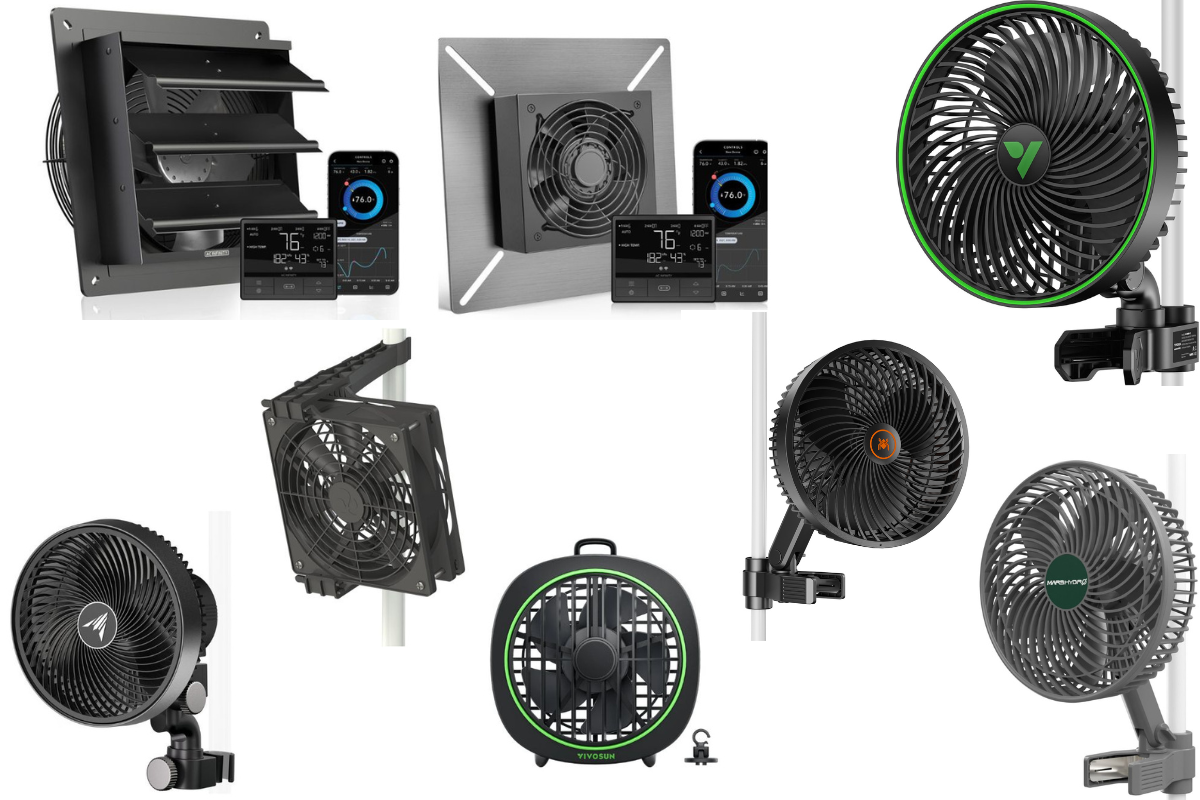
Fans
Insufficient ventilation can lead to mould development, which can be detrimental for any new marijuana grower. Clip and oscillating fans can help circulate air and prevent stagnant pockets that encourage mould and pest growth. With these three oscillating fans, you can ensure proper air circulation indoors.
- The Vivosun AeroWave E6 is perfect for smaller indoor gardens. Its versatile clamp, natural wind mode, 90° horizontal oscillation and 80° manual vertical adjustment provide optimal air circulation for plants. It also operates quietly and has ten adjustable airflow speeds.
- The CLOUDRAY A9 by Ac Infinity features ten digital speeds and is suitable for medium-sized tents. It is IP-44 rated, making it resistant to high humidity and heat. Additionally, it can be connected with smart controllers to access climate triggers, grow cycles, and more.
- The oscillating PRO FAN from Garden High Pro is perfect for bigger indoor spaces, with a diameter of 25 cm. It features two adjustable speeds, operates at 20 W, and produces low noise. The fan is designed to fit constructions with a rod diameter of up to 30 mm.
Intake fan
In a grow room, the intake fan is crucial in providing fresh air to the plants. It works in harmony with an inline fan, which creates a positive pressure system to propel air through the ducts, regulating air circulation for optimal plant growth. Here are three of our favourites!
- This compact and efficient duct fan by Vivosun is perfect for indoor areas with limited space. It’s powerful motor operates quietly without maintenance. It’s 4-inch diameter, 2930 RPM speed, and impressive airflow provide optimal air circulation for healthy plant growth.
- The Dreyoo 6-inch Inline Duct Fan has a powerful motor with wind pressure of 70pa and 6-inch airflow, enhancing air circulation and operating quietly, making it ideal for medium-sized grow tents. It offers multiple connection ways for quick air change or long ducting.
- This 8-inch duct fan by Vivosun is lightweight and can adequately ventilate large indoor areas. It has a speed of 2970 RPM and provides 420 CFM airflow. The fan operates quietly, with a noise level of less than 40 dB.
Inline fan and carbon filter
If you’re growing marijuana indoors, an inline fan helps to regulate temperature, humidity, and air quality by exhausting stale air and pulling in fresh air. Carbon filters are crucial in eliminating undesirable odors before expelling air outside. Ideal for apartments or neighbours, this discreet solution removes the strong smells associated with cannabis cultivation. Check out these three excellent options that suit both beginners and experienced growers.
- Spider Farmer’s 4-inch inline Fan, Carbon Filter & Ducting Combo is perfect for smaller indoor grow spaces. It boasts an energy-efficient, silent operation and a powerful airflow of 205 CFM. The lightweight ABS blades and durable plastic housing make it a long-lasting and reliable choice, while the carbon filter effectively removes unwanted odors from the indoor grow area.
- The Mars Hydro 6-inch inline fan has a variable speed controller for easy fan speed management and an airflow of 402 CFM. It’s durable plastic housing and blades ensure quiet operation (32 dB), and it’s carbon filter eliminates pungent odors that particulate from indoor grow rooms.
- The AC-FKS8, 8″ Air Filtration Kit has everything you need to ventilate, cool, and control odors in larger indoor grow areas. It includes a CLOUDLINE inline fan with a speed controller for silent and efficient performance, a carbon filter with prefilter cloth for high-efficiency odor blocking, and four-layer flexible ducting for directing airflow.
Thermometers and hygrometers
A hygrometer measures humidity levels, whereas a thermometer can accurately measure the temperature essential for growing weed indoors. Maintaining the appropriate range prevents mould, mildew, and nutrient imbalances. Below is a list of three top-rated thermometers and hygrometers.
- This digital hygrometer/thermometer from Vivosun provides accurate temperature and humidity readings indoors, with a remote range of 200 ft/60 m and the ability to connect up to 3 wireless sensors. It has a large LCD with a backlight and touchscreen.
- The ThermoPro Digital Thermo Hygrometer wirelessly measures indoor humidity and temperature, transmitting data to the indoor base station. It has a temperature tolerance of +/-1.1°C and a humidity tolerance of 30% to 80%.
- The HYGROTHERMO PRO is an indoor thermometer from Garden High Pro with a hygrometer for precise measurements. Made with Japanese components, it monitors the temperature range from 0º – 50º / 32º – 122º F and humidity from 25% to 90%.
Humidifier
While different stages of growth require varying levels of humidity, a humidifier can help regulate the moisture in your indoor grow space, avoiding potential issues caused by excess moisture or dryness. The ideal humidity range for cannabis plants is between 40-60%. To help you choose the best humidifier for your grow tent, we have narrowed down three favourites for small, medium, and large-sized tents.
- Ac Infinity’s Cloudforge T3 is a smart humidifier for small grow tents. It features precision vapours, a corded sensor probe, and a hideable backlit display. It has ten adjustable humidity levels and can be connected to UIS controllers for dynamic climate triggers, scheduling, and app control.
- Spider Farmer’s Cool Mist humidifier is an excellent choice for growers with medium-sized tents. With four fog volume levels and a built-in hygrometer, you can customize humidity between 35%-95%. The 6L tank lasts up to 24 hours, with a daily mist output of 450 ml/, and a 12-hour timer can be set in 1-hour increments.
- The Cloudforge T7 humidifier is perfect for larger indoor growing areas. It features a smart onboard controller for humidity and timer programming, supported by a precision humidity sensor. The humidifier also includes a 15L water tank and interchangeable nozzles, making it a highly versatile option for growers.
Grower’s recommendations
Humboldt Seed Company offers various strains suitable for beginners, intermediates, and experienced growers. Let’s dive into three of our favorites and explain why they are worth considering!
1. Blueberry Muffin
As a first-time grower, you’ll be thrilled to learn about Blueberry Muffin!
This strain is a top-notch choice that guarantees excellent yields with minimal effort. It adapts well to indoor environments, so you don’t need to worry about specific requirements. Blueberry Muffin has a robust stem that can handle molds, mildew, and pests, making it an ideal option for beginners. If you’re fond of fruity strains, you’ll love the delightful scent and flavor of freshly baked muffins and blueberries.
2. Hella Jelly
If you are an intermediate grower, you might want to consider Hella Jelly as one of your options. It’s a productive sativa strain with indica growth habits that won the 2019 Phenotype Mega-Hunt.
It quickly flowers and has an abundance of resin glands, making it a hit with hash-makers worldwide. Hella Jelly thrives in all growing environments and offers a unique fruity flavor that’s a delightful departure from the typical earthy or skunky taste.
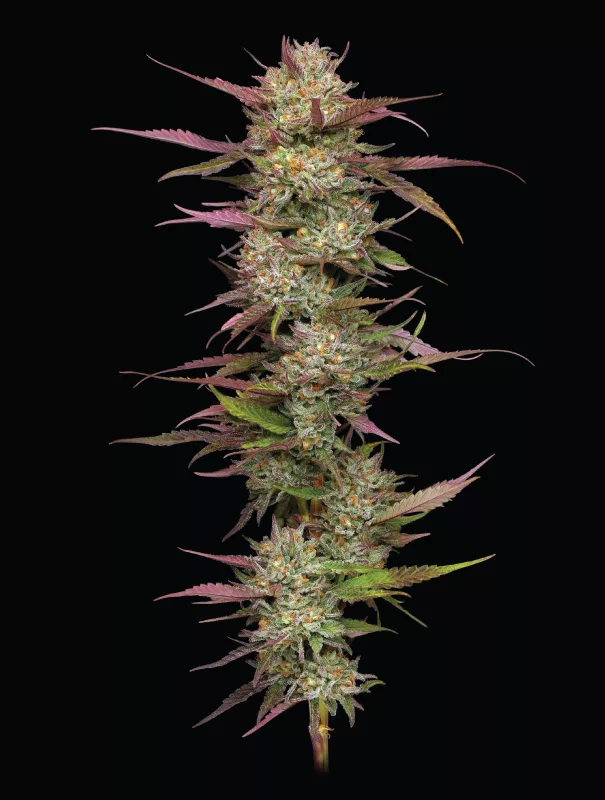
3. Gazzurple
Get ready to experience the unique characteristics of Gazzurple!
This strain is a fascinating blend of sativa growth pattern and indica flower structure. Not only does it have a high THC content, but it also produces dense buds with a sweet, fruity aroma. Moreover, it’s surprisingly mold-resistant, making it an excellent option for growers. To enhance the purple pigment, try cooler temps towards the end of the flowering cycle.
How to grow weed indoors
Let’s walk through a step-by-step guide to assist beginners with setting up an indoor grow. On average, the indoor cultivation cycle usually takes around twelve to fourteen weeks, but this can vary depending on the grower’s experience and the particular strain being grown.
Step 1: Germination
Start by placing two moist paper towels on two plates. Place the seeds an inch apart on top of one of the moist towels and cover them with the other plate. Keeping the plants in a consistently warm environment and complete darkness is essential. Check them daily and spray them with water to maintain a moist environment. Typically, the taproot will emerge within a few days, but it is not uncommon for it to take up to 14 days.
Grower tips
To maximize the success of the germination process, here are some helpful grower tips:
- High humidity levels between 65-70% and temperatures between 20-25°C are required for optimal germination rates.
- Limit light exposure to avoid damaging the seeds, and keep them in a dark location until the seedlings have emerged.
Step 2: Transplanting your seeds
Transplanting seedlings into their new home can be a delicate process, especially for beginners. Start by creating a small hole around an inch deep in your pot, and using tweezers, carefully pick up the seed, placing its root down into the soil. Cover it with a light topping of soil, put it in the indoor grow area, and wait for the seedlings to emerge, which usually takes around 72 hours.
Grower tips
Here are some tips for transplanting your cannabis seedlings into their new growing environment:
- It’s important to avoid overwatering as it can enhance the conditions for root rot and hinder growth.
- It is recommended to label your cannabis seedlings to keep track of the strains and growth developments.
Step 3: Vegetative stage
The vegetation stage is a important phase in the cannabis growth cycle, where the plant focuses on developing a robust structure before entering the flowering stage. The vegetation stage typically lasts four to eight weeks, but some growers extend this stage longer to allow for more significant plant development. Optimal results require a lighting schedule of 18 hours of light a day and 6 hours off. Maintain 40-60% humidity and temperature between 75°-90° F.
The vegetative stage of a marijuana plant is characterized by certain features distinguishing it from the flowering stage. Some critical components of a cannabis plant in the vegetative stage include a symmetrical and bushy appearance, closely spaced nodes, large serrated leaves, and the absence of flowers. During this stage, the apical mainstem and side branches continue to grow and strengthen to support future flower production.
Week 1 – During the first week after germination, the cannabis plant typically emerges from the growing medium as a seedling with two small cotyledon leaves.
Week 2 – In the second week, the plant develops its first set of true leaves, and initial root development occurs. The plant becomes more established and starts to grow taller.
Week 3 – As the plant enters its third week of growth, it usually displays a noticeable surge in development, with an increase in both nodes and leaves. The plant becomes more bushy and starts to develop its characteristic shape.
Week 4 – As the fourth-week approaches, the cannabis plant becomes sturdier as more foliage develops, increasing branching and internode spacing. The plant becomes more resilient and can handle more stress. This week is crucial for training and pruning the plant to ensure optimal growth.
To prevent your plants from growing too tall indoors, initiating the flowering process around the fourth week of vegetation is recommended. This will ensure that your plants stay within a manageable height range and won’t stretch too much during the flowering phase.
Watering
It is advised that you water every 2-4 days, taking into account the pot’s size and the root development. To check if your plants need watering, insert a finger about an inch into the soil. Water if it feels dry, but wait if it’s moist. You can gradually increase the amount of water by 100 ml per week to accommodate the plant’s growth.
Nutrients
During the vegetative stage, providing your plants with a balanced nutrient formula with higher nitrogen levels is vital. A recommended NPK ratio of around 3:1:2 can support the development of healthy leaves and stems, which lays the foundation for robust growth and a productive flowering stage.
Common mistakes
Several common mistakes can negatively impact your cannabis plants, but don’t worry – we have the solutions to help you avoid them!
- If you notice brown and crispy leaves on your cannabis plants, it could be a sign of overfeeding. Therefore, it is crucial to follow the recommended nutrient ratios provided.
- If your plant shows droopy leaves, it could indicate it is being underwatered.
- Cannabis plants may develop elongated stems if the light source is too far away. It is advisable to keep the light source at a distance of 12-24 inches above the plant canopy to prevent this from happening.
Grower tips
The proper development of healthy buds largely depends on the vegetation stage. However, there are a few common mistakes that first-time growers tend to make. Let’s take a closer look at them.
- Over-watering can cause root issues and nutrient deficiencies, so letting the soil dry out between watering is essential.
- A gentle breeze on the stem can be beneficial to strengthen the stem and make it more robust.
- Remove dead or yellowing leaves to redirect the plant’s energy towards vegetative growth.
Step 4: Flowering stage
To initiate the flowering stage, indoor growers use a light schedule of 12 hours on and 12 hours off. For most cannabis strains, the flowering period lasts around 7-9 weeks, but some sativas may require an even longer duration for their buds to mature. Proper timing and light intensity are crucial for successful flowering and achieving the desired yield and potency of the final product. To help you prepare for the flowering stage, here is a weekly guide that outlines what to expect.
Week 1 – To transition to the flowering stage, switch the light cycle to 12 hours of light and 12 hours of darkness. You may not notice any significant changes in the first week of flowering.
Week 2 – Small white hairs called stigmas start emerging from the internodal joins, and the plant will experience significant vertical growth, commonly referred to as “the stretch.”
Week 3 – As the plant progresses, the calyxes will swell, and more energy will be directed towards bud development. Despite this, the plant will continue to grow vertically.
Week 4 – During the fourth week of flowering, the calyxes of the plant will notably enlarge, and the pistils will continue to develop. Additionally, the trichomes will become increasingly abundant.
Week 5 – Trichome production is currently in overdrive, and pistils will become more abundant. Buds will become visible as the plant progresses towards harvest.
Week 6 – The buds will continue to grow and ripen gradually. You may notice that the pistils begin darkening, and some fan leaves may start to yellow and wilt.
Week 7 – As the buds near maturity, the trichomes will mostly appear clear, and the fragrance will become more potent. The bracts will start to become plump, and a thick layer of trichomes will encase the buds.
Week 8 – At this stage, the buds will have fully matured, becoming dense and resinous, with a strong aroma and vibrant colors. The trichomes will turn a milky white color, indicating that the cannabinoid levels are at their peak and it’s time for harvest!
Watering
During flowering, It is recommended to water indoor cannabis plants every 2-3 days. However, only water your plants when the top inch of soil feels dry. Another way to determine if your plant needs watering is to lift the pot and check its weight. If the pot feels exceptionally light, it’s time to water your plant.
Additionally, it’s crucial to maintain the pH level of the water between 6.0 and 7.0. To do this, use a pH meter to check the pH level of the water and adjust it accordingly using a pH up or pH down solution. Allow the soil to dry slightly between watering sessions to prevent overwatering and root rot.
Nutrients
The nutritional requirements of cannabis plants change significantly during the flowering stage. Higher levels of phosphorus and potassium are essential for optimal bud development. It is recommended to follow fertilizer instructions, starting with lower concentrations and adjusting as necessary. Here are some basic guidelines for the NPK ratio during the flowering stage.
Early flowering –NPK 2-1-2.
Mid-flowering – NPK ratio of 1-3–4
Late-flowering – NPK ratio of either 1-4-5 or 0-5-4.
Common mistakes
During the flowering period, novice growers tend to make some common mistakes. Let’s take a look at them so that you can avoid making the same errors.
- If you observe any signs of mould growth in your plants, it’s an indication that the humidity levels are too high, so it’s necessary to improve ventilation.
- Tall and spindly plants with poor bud development are common issues resulting from inadequate lighting. To avoid such problems, keeping the light source between 12-24 inches above the plant canopy is recommended.
- If your plants exhibit stunted growth, it could indicate a Ph deficiency, negatively impacting their ability to absorb nutrients.
Grower tips
Here are some helpful tips for growers to ensure a successful flowering period and a bountiful harvest.
- During the third or fourth week of flowering, it’s recommended to defoliate your plants to improve air circulation and allow more light to penetrate the lower parts of the plant.
- Prevent any light leakage into your indoor grow tent, as this can significantly impede the development of your plants.
- Maintain humidity levels between 40 -50% to avoid bud rot, and maintain stable temperature between 65-80°F (18-27°C) to prevent plant stress.
Step 4: Flushing
Flushing involves watering plants without nutrients to remove accumulated salts and unwanted residues from the growing medium. This process helps to eliminate residual chemicals or contaminants that could affect the final product. To improve the taste and aroma of the final product and ensure its quality and potency, flush your plants with pure water during the last 14 days of their growth cycle.
Grower tips
Flushing is a relatively straightforward process, but here are some pro tips to help you get the most out of it.
- When flushing, use a volume of water four times your pot’s size to remove all excess nutrients and minerals from the growing medium.
- Remove excess run-off during watering, as allowing it to accumulate can lead to waterlogged soil, root rot, and nutrient deficiencies.
- Adjust the pH of the water to 6 before flushing. This will help ensure the plant can adequately absorb the nutrients and avoid any potential nutrient lockout.
Step 5: Harvesting
While the yellowing of the leaves is a common indication that the harvest is approaching, you may also check for trichome colors to determine the right time for harvesting your cannabis plants.
To do this, grab a jeweller’s loupe and check out those trichomes on the buds. Clear trichomes indicate an early harvest, while abundant amber trichomes suggest a late harvest. Waiting until around 70% of trichomes are primarily cloudy with approximately 30% amber before harvesting is recommended to achieve the desired effects.
Once you’ve verified that it’s the right time to harvest, wear protective gloves and follow this guide for a smooth and successful process.
- Harvesting the colas first is recommended, which allows the lower buds more time to mature.
- Removing larger fan leaves can help reduce excess moisture in the buds. These leaves tend to hold onto more water and can slow down the drying process.
- Leave some smaller leaves near the buds, as they can protect the trichomes during drying.
- Once the lower buds have matured, you can cut the system down directly at the base.
- Place all buds in a container and move to the drying room.
Common mistakes
Growing cannabis indoors can present some challenges for novice growers during the harvesting process. To help you avoid some common mistakes, we have outlined them below.
- Waiting too long to harvest your cannabis can be detrimental to your harvest, leading to underdeveloped buds and a lack of beneficial cannabinoids.
- Harvesting your cannabis too early can have negative consequences, such as self-pollination and the appearance of seeds in your buds.
- Inadequate airflow can result in mould and mildew growth, potentially ruining your harvest. To prevent spread, remove any affected areas and increase ventilation.
Grower tips
We’ve compiled some tips and tricks for a successful and bountiful harvest.
- When cutting your buds, leave around 5 inches of stem attached, which allows for easier handling and acts as a handle, preventing damage to the buds.
- Clip the stems of your harvested buds to create a hook shape, which is perfect for drying.
- Handle the bud with care to avoid damaging resin glands.
Step 6: Dry and cure
Drying involves removing moisture from the buds, while curing is equally vital as it helps to eliminate the remaining chlorophyll in the buds. This results in a smoother smoking experience and enhances the overall flavour and aroma of the final product, making it more enjoyable for the user. We are here to guide you through the process step by step.
- First, hang harvested branches upside down in a cool, dark area with ventilation. It’s recommended to keep the temperature at 60-70°F (15-21°C) and the humidity at 45-55%.
- Check moisture levels regularly over a 14-day drying process. An excellent tip for growers is to bend the smaller stems of their plants. If they snap easily, it is a sign that the buds are ready for trimming.
- Use scissors to remove excess bud material, including fan leaves, stems, and other non-cannabinoid-rich parts. This process not only enhances the appearance of the buds but also improves the potency and flavor of the final product.
- Then, to start the curing process, place the buds in airtight glass jars and maintain humidity levels at 58-62% to prevent mould growth.
- Open the jars occasionally for fresh air, and cure the buds for several weeks.
- Store the cured buds in a cool, dark place, away from light and moisture, to maintain their freshness.
Common mistakes
Growing marijuana indoors comes with its own set of challenges, particularly during the drying and curing process. To help novice growers avoid common mistakes, we have compiled a list of tips and recommendations. With these guidelines, you can ensure a flavorful yield.
- Drying too quickly can produce harsh, crispy buds lacking flavour and potency.
- Proper curing of cannabis buds can take several weeks, and failing to give them enough time can result in a harsh, unpleasant smoking experience.
Growers tips
Just like growing, drying and curing cannabis is considered an art that requires attention to detail, here are some essential factors to consider.
- Much like a fine wine, cannabis also benefits from a longer curing process, which can enhance the flavor, aroma, and potency of the final product.
- Remember to burp your jars when curing cannabis, as stagnant air pockets can develop inside the jars, leading to the growth of botrytis.
FAQs
We have compiled some simple yet informative answers to common questions that may arise. Read on and discover expert tips to help you grow the best indoor-grown cannabis.
What does it cost to grow weed indoors?
Growing weed indoors can cost anywhere from $500 upwards, depending on the size of the grow space, equipment used, and electricity rates.
What is the difference between growing cannabis indoors and outdoors?
Indoor growing offers control over conditions, while outdoor cultivation relies on nature. Indoor growing can lead to higher quality, while outdoor growing can be more cost-effective with natural flavours and aromas.
How often should I water cannabis plants indoors?
For indoor cannabis plants, watering frequency depends on plant size, soil type, and container size. Generally, water plants when the top inch of soil is dry to avoid overwatering.
What kind of grow lights should I use?
LED grow lights are highly efficient, minimizing energy consumption and heat emission, which makes them a popular choice over HID lights.
What kind of soil should I use for growing cannabis indoors?
When growing marijuana indoors, use soil that is rich in nutrients and explicitly designed for cannabis, or make your own mix with coco coir, perlite, and compost.
How much electricity do you need to grow weed indoors?
Electricity usage for indoor cannabis cultivation varies based on the grow space size, lighting type, ventilation, and other equipment. LED lights are the most efficient option.
Does growing weed indoors smell strong?
Growing cannabis indoors can produce a strong odor during the maturing stage. Carbon filters can help eliminate unwanted aromas.
What’s the best temperature and humidity for an indoor grow?
The ideal temperature range is between 70-85°F during the day and 60-70°F at night. The ideal humidity range is between 40-60%.


